 |
| changing mat for baby |
Today I'd like to share what I made recently for my baby girl.
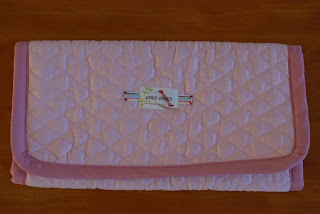
The photo on the top is portable changing mat which I used when my son was little.
I bought it, because I didn't have sewing machine at this time.
This changing mat worked very well and I loved it. So It was one of the lists which I would like to make for a long time.
It looks like made from two fabric, one is oil cloth and other side is pre-quilted fabric.
Put two fabric together with bias tape around.
Here is my fabric combination.
 |
| Japanese oil cloth fabric |
Pink pre-quilted fabric is from Joann. I cut them about 13.5" w x 20" h.
Just sew them together with bias tape. I attached velco to close.
However, it was not so simple...... I think the bias tape was too wide, so it was very difficult to sew beautifully.
But it will work.... maybe.
Here is another changing mat.
This one is easy to make. Sew oil cloth and cotton fabric right side together, flip it and sew around of the mat to close. I added ribbon to roll up.
I can fold it small size to carry.
Personally, I recommended to make this way.
More baby item will come! please visit again.
Happy Sewing.
*****************************************
皆さんこんにちは。今日から学校が始まり、息子も喜んで登校していきました。
今日は、今年のハンドメイド第一号を紹介したいと思います。
赤ちゃんのオムツ替えのときに使う、チェンジングマットです。
トップの写真のブルーのマットは、息子が赤ちゃんの時に使って大活躍した物です。
折りたためるので、出かけ先にも持っていって本当によくつかいました。
もう、染みがついていたり、綺麗とはいえないのですが、その便利さゆえ捨てられず保存していました。当時、ミシンを持っていなかったので、これはお店で買った商品です。
よく見ると、2枚の布(ラミネートとキルト布)を重ねて、バイアステープでくるんだだけと言うとてもシンプルな作り。
早速、わたしも同じように作ってみる事にしました。ラミネートの布は、以前里帰りした時に何かに使えるかもと購入して、布山の一角に眠っていたものです。^^
生まれてくる赤ちゃんは女の子の予定なので、柄的にもピッタリ!
50cmで購入していたので、無駄にしないように、高さを50cm、横幅を13.5インチで裁断。
(このサイズは、ブルーのチェンジングマットとほぼ同じです)
あわせるピンクのキルト布も布山の一角から出てきたものです。(ジョアンで購入)
四隅を丸くして、いざバイアステープで縫い合わせてみると、、、、
見た目よりシンプルではありませんでしたーーーー(苦笑)
多分、バイアステープ(市販)の幅が広すぎたんでしょう。伸びないラミネートの布に対して、キルトの布は少しづつ伸びたりするのでゆがみも出てきますし、生地も厚かったしね。
地道にしつけをして、ミシンで仕上げましたが、裏面はちょっと見せられないくらいです。^^;
これは、家用で使いますか。。。便利な事実は変わりませんからね。
リベンジのつもりで、もう一枚作っています。それが最後の写真のもの。
こちらは、シンプルにラミネートとコットンファブリックを中表に合わせて縫い、ひっくり返して周囲ぐるりと縫って仕上げました。
リボンを挟んで縫ったので、ロールアップして止められるようになっています。
キルト芯を挟んでいないので、ペタンコですが、出かけ先で使うくらいならこれで十分なのではないでしょうか。
小さくロールアップも出来ますし、持ち運びにも便利なはず。
まだこのラミネート生地が残っているので、オムツポーチでもつくろうかなと思っています。
その他、Burpcloth、涎掛け、ベビーキルトと少しづつ作っているので、また紹介しますね!


2 件のコメント:
such pretty fabrics! I bet the binding was hard to do, a layer of oilcloth and a layer of fabric must be tough to get through
hello Wendy, thank you for your comment. Yes, the binding was very hard!! That is why I did not take the picture closer.;)
コメントを投稿